About Adsense Consent GDPR On Blogger

Got Adsense on your blog and worried about how to implement the pop up consent form? Well, you may not have to worry anymore. Google have declared that they will be doing this automatically for those who don't yet have one installed. Here is their message for those who have not yet implemented the GDPR consent form.

"Remember to publish your GDPR message using a Google-certified CMP to continue showing AdSense ads on your site in the EEA and the UK. If you don't publish it by January 16, 2024, we'll publish one for you."


GDPR_Adsense_Popup

This is what Google's consent form looks like


If you have no idea of what to put in your GDPR / Privacy Policy consent / messages this is great news. But, you may still want to tailor the messages a bit to suit your site and data collection procedure, but that's up to you. I'm sure who Google publish should be sufficient. Also be aware, this form can be used, for free, on any other website that falls into the category of serving Adsense Ads to the EEA [I believe this is Europe] and the UK, the form / popup is not exclusive to Blogger blogs. And, once integrated, it should show up automatically in mobile and normal web versions when adblockers are disabled.

There are other options available in the popup, such as opting for 3 buttons instead of two. The third button being an "I do not consent button". But I would not recommend this if you want the maximum amount of visitors to see your Adsense ads, because many people will click I do not consent. I know I do. hehe. Just don't be too intrusive with the ads and that should be fine.

Adding More Elements In Mobile Blogger

How to make elements [advertisements [including Adsense], html / java widgets etc] show up in the mobile version of your Blogger template. This will be a very quick post. If you have looked at the mobile version of your Blogger template and wondered why none of your widgets or advertisements are showing up like they are in the normal web based version, this post will show you how to get them to appear.

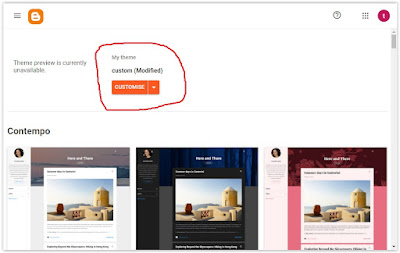
First off, go to the "Theme" tab in the sidebar and click it. At the top of the page click the arrow next to the orange "Customise" button [see picture below].


edit_m1


A drop down menu will appear. Click "Edit HTML". Find the widget or advertisement that you want to appear in the mobile version of your blog.

If you don't know how to do this, you can either find it manually, or you can click the 4 square symbol on the right of the page. See the picture below. A drop down menu will appear and you can then find and click the widget you want to edit.


finding_widgets_blogger_blogspot


Once that is achieved you should add the following code to your widget [pictured below].


add_mobile_elements_blogspot_website


As seen in the image above, all you have to do is add the code: mobile="yes" somewhere on the line that is underlined in the picture. I usually add it just after locked='false'.

And that's it. Once you have added the mobile="yes" code in the right location press save. You can then go to the mobile theme preview and take a look. Your blogger mobile theme should now be showing the widget with the added code in the mobile version of your blog. You can then just repeat this process for any / all the widgets you want to show in the mobile version of your blog / website. Hope this helped you out. Until the next time amigo.

If you have any questions just leave a comment.

Blocking YouTube Ads in 2024

It's no secret that YouTube have become super aggressive with their advertisements within the last year or so. And for many people it has become almost unbearable. Not just with the frequency of the ads themselves either, but also with their content. Which some people are finding to be quite offensive, s*xual in nature, or downright scams. Their ad standards, as in what they accept to be shown, seems to have dropped considerably. Add to the fact that a good majority of the ads can't even be skipped and its clear that this has become really annoying for users.

 If I had to watch ads on YouTube and there was no way to stop them, I would simply just stop using the website altogether. Either that or I would watch the videos from YouTube on another site [I may write a post about how to do that at some point]. But yeah, many people are extremely frustrated with YouTube and I can understand why. So today I will show you how to block all ads from showing on videos. And its really easy.


uBlock_Origin_Open_Source_Adverts


All you have to do is go and download an adblocker called uBlock Origin. 

You can download it here for Windows / Desktop PC.

It's also available for Android or iOS based systems [smartphones, tablets etc] when used as an add-on for the browser. So, just go and download it direct as an add-on / extension. Works with Firefox, Chrome, Brave, Edge and Opera.


Only YouTube


Once installed that should be it. uBlock Origin will now block ads on YouTube. If you only want to use it for blocking ads on YouTube, and not on any other website, take a look at the screenshot below which shows how to use uBlock Origin to only block ads on specific sites. In our case, YouTube.


Stop_YouTube_ads_showing


Just click details and go to "site access". Choose the "on specific sites" option from the drop down menu. Then click "Add a new page". Add YouTube's URL: https://www.youtube.com/. And that's it, uBlock Origin will now only work with YouTube. You can allow access to other sites [block other ads] at any time. 

A lot of the other adblockers that used to work with YouTube no longer block the ads effectively. For YouTube, uBlock Origin is the best. And I love their statement at the bottom of the page, and I quote: "I will not accept donations or sponsorships of any kind." Many other adblock companies sold out to YouTube and other websites a long time ago. Anyway, hope this post helped you out. Until the next time amigo.

Adblock Plus Showing Ads Fastest Fix

Reference: [Adblock Plus on Firefox 100.0 - Windows 7]. So today I go on to YouTube and I'm surprised to see that Ads are showing up! Not only in the videos themselves, but also in the sidebar (I use a desktop PC). I can't have this. If I have to sit and watch Ads, on any site, I will literally never visit the site again if there is no way to remove them.


Adblock_Plus_Still_Showing_Ads_Fastest_Fix_2022

That's how much I hate Advertisements. Don't get me wrong, One or two that just sit in the sidebar or below content I can live with. I know sites need to earn revenue. But in-video advertisements, pop ups and pop-unders are just not acceptable to me.

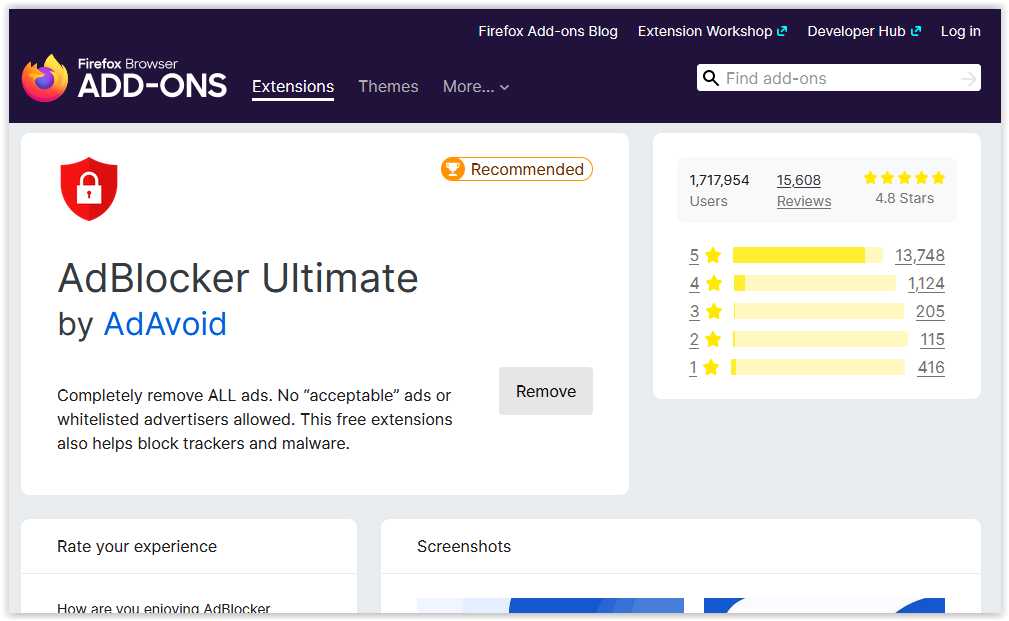
Ads are not just showing up on Youtube either. I'm seeing ads in Google Search, Reddit, and even Bitchute. Some people were saying that Youtube had changed something and that's why they are seeing Ads. But like I said, for me they are / were on other sites too, so its obvious that Adblock Plus is broken. It's not blocking anything anymore.


So, what's the fix

This is the fastest fix ever. Are you ready. First off, uninstall Adblock Plus. Then go and install AdBlocker Ultimate. You can find it here for Firefox - and here for Chrome [its free]. Ads are now totally gone. If you are a dedicated Plus user and want to use it again in the future, you should be able to. Just give them a bit of time to find and fix the problems. In the meantime use Ultimate. Until the next time amigo.

Block Before You Continue YouTube Popup

How To: Block / Remove the Before You Continue YouTube sign-in Pop-up. This has become very annoying. YouTube just won't stop asking you to log-in. Only problem for me, is that my main Google account that I use everyday had its YouTube account banned due to me uploading a few Mike Tyson videos about 12 years ago. This seems crazy now because so many people upload those sorts of clips, and I doubt many get banned these days with "fair use" etc. Anyway, I'm banned. So I can't login even if I wanted to. 

I'm already logged into my Google account, but still, YouTube doesn't recognize this and just won't stop trying to get me to login or accept their privacy terms and conditions even though technically I already have because I'm logged in. We're stuck in a constant loop. Anyway, enough about all that. Today I'll show you how to remove all these annoying pop-ups quite easily.


How To Remove "Before you continue" sign-in message on YouTube

First things first: Go and download / install Adblock Plus. It's available for many browsers, including Chrome, FireFox, Safari, Opera and Microsoft Edge. 


You can download it here: https://adblockplus.org/

Second: Go to Youtube and wait for the annoying pop-ups to appear. Once they do click the Adblock Plus icon at the top of your browser and use the "Block Element" feature. Click Block Element and just go and hover over the popup. Or, if using a mobile device tap the popup. If hovering, the area will turn red to signify what you are going to be blocking on the page.

Click on the popup and add it to the block list. 


Please Note: You may have to do this around 3 times to get rid of all the elements that need to be removed / blocked. There may be a full shadow over the whole page at one stage. Just use the block element in Adblock Plus again, click anywhere on the shadow and add it to the block list. Once you have done this procedure and blocked all elements Adblock Plus will save this information in the block list and you will never have to do it again. All the popups are now blocked.


An Alternative method to disable YouTube Sign in Prompt

If you want another way to block the popups that appear see below.


You still need Adblock Plus installed (can also be done with other adblockers - ublock origin etc), but I will provide you with the codes so you can put them in your blocklist (so method above not needed).

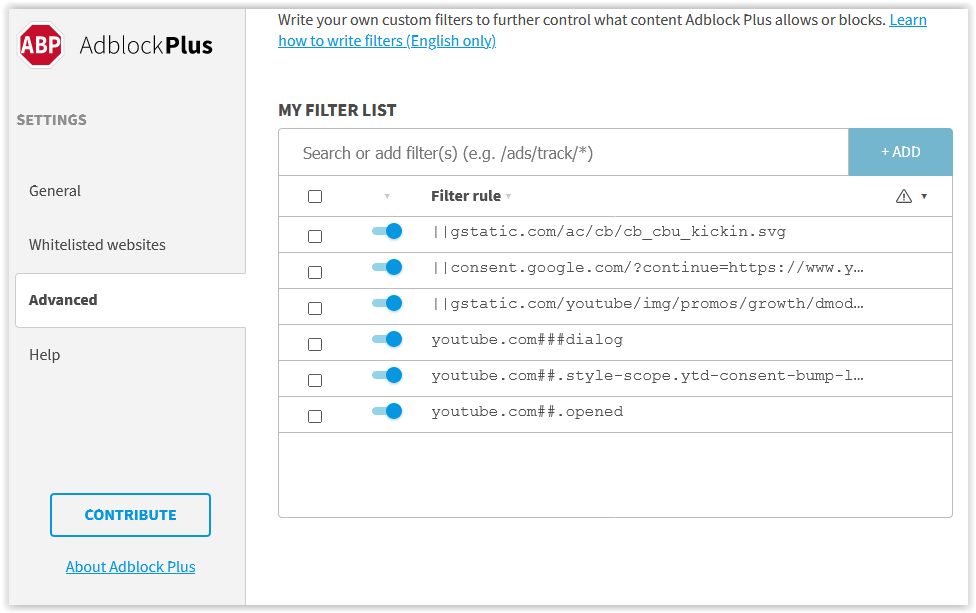
Click the Adblock Plus icon and click the COG symbol to get to the settings. Click the "Advanced" tab. Scroll down to the bottom until you see "My Filter List".

Block_Before_You_Continue_YouTube_Popup

disable_YouTube_Sign-in_Prompt

One by one, add the lines of code below to the filter list. Yes, the lines at the start of the first few are needed. Make sure they are all turned on (see the second image above, they are on / activated / being blocked).

Copy the codes below to the filter list:


||gstatic.com/ac/cb/cb_cbu_kickin.svg


||consent.google.com/?continue=https://www.youtube.com/&origin=https://www.youtube.com&pc=yt&hl=en-GB&gl=FR&if=1&m=0&l=0&uxe=23934718


||gstatic.com/youtube/img/promos/growth/dmod_si_horizontal_ver1_240x400.png


youtube.com###dialog


youtube.com##.style-scope.ytd-consent-bump-lightbox


youtube.com##.opened


 And that's it, all done.

With either of these methods, they both achieve the same result. However, one might be easier for some people to perform than the other, so I included both. Any questions just let me know. Until the next time amigo.

Disable "Feedback" Comments Wordpress

How To: Disable "feedback" Comments on Wordpress.org. The amount of people using BOT (automated) software to spam the hell out of WordPress websites is crazy high. Disabling the ability for visitors to leave a comment isn't good enough any more.

You can disable people from commenting, but then still get loads of spam comments coming through from the "feedback" form. For the majority of people, this sneaky backdoor comment enabling system is usually down to the Jetpack plugin and its contact form feature. It's enabled by default, and it's really annoying. So we need to turn it off.

However, if you search through the tabs trying to disable the contact form, you won't find any option to quickly turn this feature off. But the option is there. It's just hidden. Today I'll show you how to completely remove the feedback feature and totally remove the tab from the WordPress sidebar. Let's get started.

How To: Disable "Feedback" Comments from Wordpress.org


In the WordPress dashboard go to Jetpack and click the dashboard tab. Scroll all the way down to the bottom of the page and you will see a line of greyed out links, which reads as follows: [Jetpack version 8.7.1 | About | Terms | Privacy | Modules | Debug]. Here is a picture.

debug-

Click Debug [Far right]


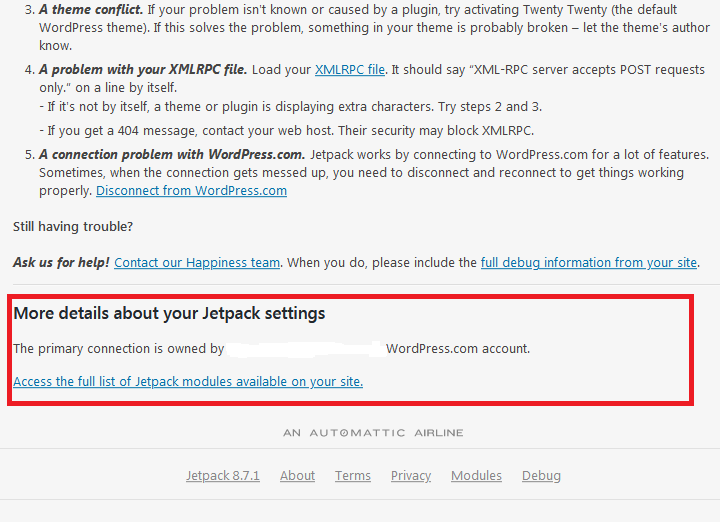
Scroll to the bottom of the page and you will see a link that reads "Access the full list of Jetpack modules available on your site." See the image below with the location of this link highlighted in red.
disable-modules-jetpack

Click the link


Upon clicking the link you will now see a list of all the modules. Find "Contact Form" [near the top] and deactivate it by clicking "deactivate". See the image below for the location [highlighted in red].

deactivate-contact-form-jetpack-wordpress_org


And that's it. Feedback comments are now disabled and the Feedback tab has also been removed from the WordPress dashboard sidebar. Hope this helped you out. Until the next time amigo.

How To: Embed Bitchute Video In Blogger

How to embed a Bitchute video in a Blogger post. Hello everyone, it's been a while since I wrote a post on this blog, so I thought I would write one on a subject that many people seem to be very confused about. Embedding Bitchute videos on WordPress works fine when using the recommended iframe code, but when it comes to Blogger (Blogspot), people just can't manage to get the video to embed. So today I will show you how to embed any Bitchute video on any Blogger blog. And you will not believe how easy it is.

Blocked_by_X-Frame-Options_Policy

If you tried to install a video using the YouTube embed code. As in, copy the embed code of a YouTube video and just replace the YouTube video URL link with the Bitchute video link you want to embed, you may have come across the "Blocked by X-Frame-Options Policy" error code. And to get that removed involves changing certain settings that really shouldn't need to changed in 2020 /2021. And if you just embedded the code offered by Bitchute, you would have no doubt seen that it just does not work on Blogger.

How to embed a Bitchute video in a Blogger post


Certain character codes won't work on Blogger. When associated with an iframe code on Blogger, Square brackets, which is these [ ], are not viable. So this is where the main problem is. Blogger needs and uses angle brackets (and also a closing iframe code), which is these < >. So all you have to do in order to embed a Bitchute video on a Blogspot blog is literally just change the ends of the iframe embed code from using [ ] to < > and add a closing iframe code (</iframe>). There is also one other small requirement (very easy). Read below.

Example: Below is the recommended code that is used on WordPress to embed / install a Bitchute video.

[iframe src="https://www.bitchute.com/embed/UGlrF9o9b-Q/" width="100%" height="360"]

And below is the changed code to what we need to use in order to embed the video into Blogger. Just the arrows < > (angle brackets) at each end and a closing iframe code (</iframe>) are different. Everything else, other than the word "video" in the URL remains the same (See the Second Step below for the explanation).


<iframe src="https://www.bitchute.com/embed/emQvJI3Jgr7m/" width="100%" height="360"></iframe>

Second Step


However, please note: If you are copying Bitchute links directly from your Browsers URL bar, which is what you will more than likely do, it won't come with the word "embed" in the link, which is what we need in order to embed videos. It will come with the word "video" in the link. This will not work on Blogger.

Example of a copied Bitchute link from the browser URL bar:

https://www.bitchute.com/video/UGlrF9o9b-Q/

As a result, you will also need to change where it says "video" in each URL link to "embed" for the video to embed correctly.

Example of the correct code below. This is how you need it to look (obviously using your own video URL link).


<iframe src="https://www.bitchute.com/embed/UGlrF9o9b-Q/" width="100%" height="360"></iframe>

And here is the correct code in action (using a different video):

Software used in the video: Viddyoze

So, to summarize: Change the character symbols on each end from [ ] to < >, add a closing iframe code tag </iframe> and change the word "video" in each URL link you copy to "embed". And that's it.

I know there are a lot of people pulling their hair out over this issue, so I hope this helped you out. A share would be appreciated. Until the next time amigo.

Vista User? Time To Ditch Firefox

Anyone still using Firefox with the Vista Operating System will no doubt have been experiencing some very annoying stability issues. The problems are numerous, and will take too long for me to go through one by one. However, if you are completely sick of how problematic Firefox has become to use with Vista, the reason is because Firefox has now stopped all support for Vista OS.

So its time to ditch Firefox and find a better solution for browsing. Most people usually go for Google Chrome, but now even Chrome has stopped all support for Windows Vista users. You could always download an earlier version of Chrome and it will still work. However, it will be quite buggy and will no doubt become unstable and annoying to use at times.


As a Vista user myself, the browser I have moved on to is Pale Moon. It's very similar to Firefox but much faster and more stable to use. It's not perfect though. One area that it struggles with is captcha's. It can't click the "I'm not a robot button". This can be an inconvenience, but after a while you just get used to it. For important things that need me to solve the captcha, like submitting my website / blog posts to Google Webmaster Tools for indexing, I use Firefox.

So if you do download and use Pale Moon, make sure you keep Firefox installed on your computer and fire it up if you need to complete a captcha. Other than this issue Pale Moon has been a good browser so far to use with Vista 32bit and 64bit. I have Vista 64bit OS installed and I'm using Pale Moon version 27.9.4 (32-bit) and it works well. If you want to use that you can find that version here: https://ia601306.us.archive.org/zipview.php?zip=/25/items/Pale_Moon_Archive_2015_08/Pale_Moon_Archive_2015_08.zip.

Or you can download the latest release here: https://www.palemoon.org/download.shtml

Why Is Firefox So Slow Fix August 2018

You know when problems arise and you think to yourself, I really don't need this right now. That's what I've been feeling like with this Firefox running at a snail pace problem. Why is it so slow? Well, first I should say. Due to people using different operating systems, from Windows to Android, and with each individual have different software and programs running on their computers (and Smartphones) this fix will is not going to be a one size fits all. However, it did work for me, instantly. And now my Firefox is working really fast again.

What Fixed A Lethargic Firefox


For me it was just a simple case of disabling what has now come to be a real problem bit of software for me. That is Shockwave Flash. Once Adobe stop updating and the scripts in the software are outdated and lag behind, which is very common as Adobe seem to only release an update once or twice a year, it has the ability to slow browsers down to a snails pace. Images take ages to load, videos stall and take a long time to render, web pages stop responding etc. For some reason Shockwave Flash was putting a serious strain on my system by using up all the computer RAM and making everything become unstable. It's seriously annoying.

How To Disable Slowness

Why-is-firefox-so-slow-2018

Go to the Add-ons page in Firefox, find Shockwave Flash and disable it completely. Restart your browser and that should be all that is needed. I also disabled the OpenH264 Video Codec 1.6 by Cisco Systems for good measure, and now everything is working smoothly again. This fix may not work for everyone, but its definitely worth a go if you have Shockwave Flash installed in your Firefox Add-ons. Is there an update out for Flash, I don't know, but I'm so annoyed with it, that I'll probably never enable it again. It's not like its desperately needed anyway. Hope this helped you out and you get what feels like a turbo boosted Firefox again like I'm experiencing right now. Until the next time amigo.

Get A Working Dark Minima Blogger Theme

I love using the older classic basic Blogger templates. Have you tried to find an old school 2 column dark / black Minima Blogspot theme lately. I have. What an annoying experience. Basically all of them are filled with errors. And some of the sites are just listing an image of the theme itself with no download option. One guy even has his little script set up on his Blogspot blog to "Please disable Adblock to continue". Wow, really mate. On a Blogspot! Now don't get me wrong, I could remove the errors if I had the patience, but why bother when there's a much quicker, less stressful fix to this situation.


black-dark-minima-blogger-blogspot-theme


How to get a fresh Black Minima Template


All you have to do is download the 2 column white version of Minima. You can download that here. Make sure you save it somewhere on your hard drive. We need to preserve the Minima theme, as its not as widespread, or as downloadable in as many places as I thought it would be.

Download, unzip the file and then install. If you install certain themes on Blogger, that are not part of their standard theme library, sometimes it won't let you edit anything in the templates "customise" editor.

Thankfully for us, Blogger does allow certain things to be changed when using the Minima theme, mostly just the colours and fonts. But that's all we need. So all you have to do is turn the theme black in the customiser and then change the rest of the colours and fonts as you see fit.

If you want to use some of the dull hex colours that were used on the original black Minima, here are some of the main ones. Background #000000 - Page Text #cccccc - Link colour #99aadd - Post Title #aadd99 - Sidebar Title #777777 - Visited Link #aa77aa. I believe the fonts are the same with both templates, so if you want the original fonts just don't change anything and that will be fine. So there you go, a fully functional Black Minima. One of the best and easiest themes to work with. Hope this helped you out. Until the next time amigo.

How To Edit Your Channel Art On YouTube

How to fix the "sign-in" loop error that occurs when trying to change / edit your YouTube channel. If you're here, I'm sure you know all about this annoying issue. You try to change your channel art and it just keeps asking you to sign-in, even though you are already fully signed in. This fix is intended for Firefox, because that's what browser I use. But it will also work with any of the other browser by just applying this same easy optional change to the way your browser is dealing with Cookies. In Chrome the process may be a bit different in terms of what tabs you need to click on to change the Cookie settings. But it shouldn't be too different to this.

How to fix the Sign-In error when editing a YouTube channel using Firefox


Go to the channel you want to edit and make sure you are signed in. Then head over to your "Tools" tab in the Firefox top menu and click "Options". Then click "Privacy".

Look to where it says "Accept cookies from sites". Directly below this it says "Accept third-party cookies". Next to this there is a drop down menu. Change the setting in the menu, which should say "From Visited" to "Always". See below for an image example.

fix-the-sign-in-loop-error-youtube-channel-edit

So now you are always accepting cookies from third party sites. Don't worry, after you have edited your channel you can just change this back to the way it was (From Visited). After you have changed this setting to "Always" go and refresh your YouTube channel and try to edit the channel art. It should now allow you to change whatever you like without anymore problems. Hope this helped you out. Until the next time amigo.

Remove Footer Link From Origin Theme

How to remove the footer link from the SiteOrigin North Wordpress Theme, and add your own links and text. First off I just want to say, I understand that everyone has to make a living, and the people who make this Origin WP theme want everyone to purchase the premium theme (so they make money etc), but I personally don't like how hard they try to push this. In some forum replies, I even seen them say to people that there is no way to remove the link without purchasing premium options.

When someone, either an individual or a theme company designs and releases a theme into the Wordpress.org free themes database under a GPL (General Public License), the end user is allowed to edit / modify the theme as they see fit. That includes removing the link from the footer if they want to.

If the people over at Origin have a problem with this, don't release the theme as free on Wordpress.org. Market / Advertise it on your own Networks. Don't get me wrong, the link is easy to remove, but for someone who hasn't got much experience with websites / Wordpress, it can be a bit of a nightmare. And I've seen many threads created where people are really confused and annoyed because they can't remove the link, and are getting pushed into spending money to have full freedom over the theme. Today I will show you how to quickly remove this link. You could create a child theme and remove it that way, but I can never be bothered with those! I know, I'm silly, but I prefer to do as little work, or coding as possible to get the desired result. And I bet you do too. So here we go.

How to remove the footer link from the SiteOrigin North Wordpress Theme


Install the Origin theme. Choose "appearance" from the left hand wordpress option tabs. Click customize. Choose "Additional CSS".

Add this code to the Additional CSS box: .site-info { display: none; }

Press Publish

Yes, the dot at the start of site-info is needed so don't forget to copy that too.

You should now see that the whole footer has disappeared. So the link is gone. To add your own links and text to the footer all you need to do is add a Custom HTML widget to the the footer area. SiteOrigin North comes with a footer widget area, so go to "Widgets" and created a custom HTML widget and place it in the footer. Add all your text and links and then just align it to the location of your choice.

Example: I want my copyright information to be in the middle of the footer so it looks nice and professional. So here is the code:

<div align="center">
Copyright © yourlink - and then some more text, or even more links
</div>

And that's it. All done. If you want to add some Google Adsense Ads and have seen that when added to Origin they have a big yellow box around them, just add this snippet of code below to the "Additional CSS" box:

ins.adsbygoogle { background: transparent !important; }

Hope this helped you out. Until the next time amigo.

Adsense Blogger Mobile (Easiest way)

How to get Adsense ads to show up in mobile devices (Android, iOS etc) on blogger. There are several ways to do this. One of those, which involves converting the Adsense code and inserting it directly into the HTML of your blogspot blog is covered here. Some people have had trouble with this method as it can be slightly confusing for those who have limited knowledge with blogger + HTML code.

The method covered in this post is easier, but still involves the user have to add something to the code. It's not much, I promise! It's very easy, as you will discover below by following the instructions and added images to help if you get stuck. I'm going to be using this blog as my example below. Lets get to it. First go and make a new Adsense unit. Preferably a responsive Ad.

Then just go and add that to your blogspot site like you normally would by adding it to a HTML / JAVA widget. Once added go and click the "Theme" tab from the blogger sidebar options. I have added my Adsense unit to the top of this blog (leaderboard) so it makes it easier for me to show you this example. See below.

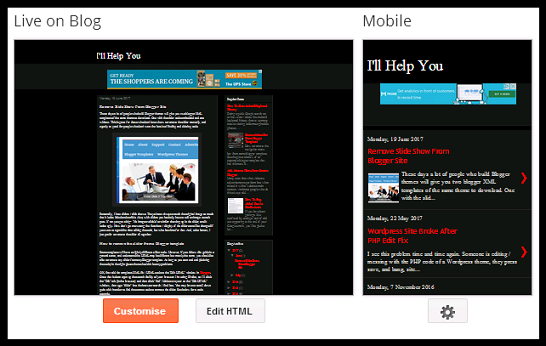
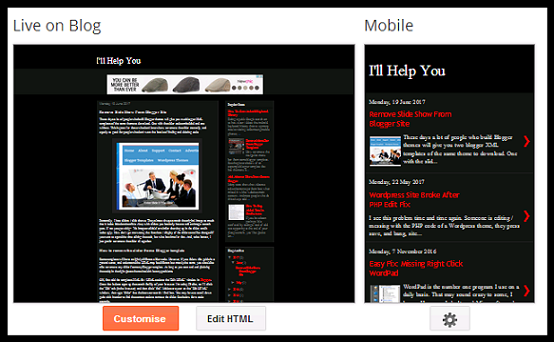
You will see that the Adsense code is visible at the top on the normal (live on blog) view. That means the Adsense ad is showing up on computers / desktops / laptops etc. This is, if they are not using an Adblocker of some sort. You will notice that in the other window (Mobile) nothing is showing up. No Ads! That means anyone viewing from an Android or iOS device won't see any Adsense.

To make the leaderboard (or any) Adsense ad show up in mobile view, here's what to do. Go to your blogger "Theme" page and click the "Edit HTML" tab (pictured above). Click the "Jump to widget" tab at the top of the HTML code. It's located next to the "Save" and "Back" tabs etc. Find the Adsense widget by clicking the widgets. In my case the Adsense widget was called HTML1. Yours probably will be, too. This will take you to the block of Adsense code. Once you can see the code look a little above it and you will see the following line, or similar depending on what HTML widget number your Adsense is located in, such as HTML1, HTML2, etc.

The line we want is: <b:widget id='HTML1' locked='false' title='' type='HTML'>. This is underlined in red above. All we need to do is add mobile='yes' to that line of code. I usually add it after - locked='false'.

So here is an example of what that line should now look like with the mobile='yes' added.

<b:widget id='HTML1' locked='false' mobile='yes' title='' type='HTML'> See the example below.

Once you have done this press save and then go and press the "Theme" tab in the blogger sidebar. Give it a few seconds to load or press the refresh button in your browser. You should now see Adsense being displayed in both normal and mobile views. See below for an example.


If you can not see any change you need to make sure that your mobile website is set to custom. To do this click the cog icon below the mobile window when on the "Theme" page (See the image above). Make sure "Yes. Show mobile theme on mobile devices." is selected (clicked) and that your "Choose mobile theme" is set to "Custom". Press save and refresh the page. You should now see that both views display your Adsense ad. Do this for other Adsense ads and they will also show up on mobile devices. But don't overdo it. I usually show one ad at the top and one at the bottom. Hope this helped you out. Until the next time amigo!

Remove Slide Show From Blogger Site

These days a lot of people who build Blogger themes will give you two blogger XML templates of the same theme to download. One with the slider code embedded and one without. This is great for those who don't know how to remove the slider manually, and equally as good for people who don't want the hassle of finding and deleting code.


Personally, I hate sliders / slide shows. They almost always stretch the original image so much that it looks faded and terrible. Also, with sliders you basically have to add an image to each post. If not you get a big - "No image available" or similar showing up in the slider, and it looks ugly. Now don't get me wrong, the functions / display of the slider can all be changed if you want to spend the time editing the code, but who has time for that. And, to be honest, I just prefer to remove the slider all together.

How to remove the slider from a Blogger template


Some templates will have a slightly different slider code. However, if you follow this guide in a general sense, and understand the HTML may be different but mostly the same, you should be able to remove any slider from any Blogger template. As long as you start and end (deleting the code) in the right places there shouldn't be any problems.

OK, first add the templates XML file / HTML code to the "Edit HTML" window in Blogspot. Once that is done open up the search facility of your browser. I'm using Firefox, so I'll click the "Edit" tab (in the browser) and then click "find". Make sure your on the "Edit HTML" window, then type "slider" into the browser search / find box. You may have to scroll down quite a bit in order to find the correct code to remove the slider. See below for a code example.

Note: Some templates, like the one I'm using as an example, mark their codes with a start and end. Such as <!-- featured post slider started -->. This is great as it makes our lives that little bit easier when taking the HTML out, because all you then need to do is remove everything in between the start and end. Job done. Be aware though, not all templates have this, so here is a code as an example of what you need to remove. Ignore the <!-- featured post slider started --> and <!-- featured post slider end --> if the template you are working with does not have them and just take out everything else.

<!-- featured post slider started -->
<b:if cond='data:blog.pageType != &quot;static_page&quot;'>
<b:if cond='data:blog.pageType != &quot;item&quot;'>

<div class='carousel slide' data-ride='carousel' id='myCarousel'>
   
<ol class='carousel-indicators'>
    <li class='active' data-slide-to='0' data-target='#myCarousel'/>
    <li data-slide-to='1' data-target='#myCarousel'/>
    <li data-slide-to='2' data-target='#myCarousel'/>
</ol>

<div class='carousel-inner'>

<div class='item active'>
   <a href='ENTER-SLIDE-1-LINK-HERE'>
   <img src='https://blogger.googleusercontent.com/img/b/R29vZ2xl/AVvXsEgHPCmpL_S6lV3BPHvDxDcD6ukTVeJtZ7-1d2qp2pRz4Ptn6fb5gMnwGs79QHvpU57wPgxx-BSVNEt6eJEeHUdO66id5zOVyaQx3Mwc0qy6lhfVA6hXgcmrrA60nddp7kDRLQifBSh2xu8/s320/slide1.jpg'/>
   </a>
   <div class='carousel-caption'>
      <p>Enter Slide 1 Title Here.</p>
   </div>
</div>

<div class='item'>
   <a href='ENTER-SLIDE-2-LINK-HERE'>
   <img src='https://blogger.googleusercontent.com/img/b/R29vZ2xl/AVvXsEjMlASH7tM9M19f4qusKNCa8tuQPIUxXimXOw9rr24nKWgfZ45P37A6LBvaEMwBS3D1MFFc3-eRzBGNWpX0lZF9WX9HmW6uiotaTzHP1OHf686YaKUunYfkJd206YW253enkoCLC1_Ssjs/s1600/slide2.jpg'/>
   </a>
   <div class='carousel-caption'>
      <p>Enter Slide 2 Title Here.</p>
   </div>
</div>

<div class='item'>
   <a href='ENTER-SLIDE-3-LINK-HERE'>
   <img src='https://blogger.googleusercontent.com/img/b/R29vZ2xl/AVvXsEjKab8admG_Pe69DlW93OtZRnMGUSFbWnr_R188YrHhV6vLUM_nYokh1lDAGLgDB47C17S2T-k2uZd4kjIguZofiqNzM84oeBcsiAj0P4sRbk9mQSRTJyqdJuOna4yaHd5pBA4DLZHUZ0o/s1600/slide3.jpg'/>
   </a>
   <div class='carousel-caption'>
      <p>Enter Slide 3 Title Here.</p>
   </div>
</div>

</div>

<a class='left carousel-control' data-slide='prev' href='#myCarousel'><span class='glyphicon glyphicon-chevron-left'><img alt='First slide' src="https://blogger.googleusercontent.com/img/b/R29vZ2xl/AVvXsEi_7aDFUX4JpbcVVbPxxuYKiB27T_252A8Oy1mfjNGDBmEoNaUZSTx6GsR13f8fmBR-sOfhxgId4R7nQVFB35IcWEodxWM_du4VSAw56zdYDP0AidGwLcq-YRfYCfapK0DBoBQrtx09sirC/s1600/previous-arrow.png"/></span></a>
<a class='right carousel-control' data-slide='next' href='#myCarousel'><span class='glyphicon glyphicon-chevron-right'><img alt='Next' src="https://blogger.googleusercontent.com/img/b/R29vZ2xl/AVvXsEh8OuB3YUECSdlB6WG1XnPAFNKsR2BAU4sVmhvr6Bmwp9vubgEWZGnnYS3XTKsVU6sCrrf4O2BWpJVdaQ43paw_HQ7z4ON2GUPcZ5xgtvpJVVvafDPHxdgeHmbAJgLtCq34-SN6i2NhyOMS/s1600/next-arrow.png"/></span></a>

</div>

</b:if>
</b:if>
<!-- featured post slider end -->


Take that ^ code out (or similar depending on the template) and then press preview. The slider should now have disappeared. If everything looks good and you are ready to proceed press "save theme". And that's it, the slider is now gone and you can start posting some content on your blog. As long as you take out the correct amount of "B" and "Div" tags (opening and closing tags: Example: </div> - </b:if>) you will be fine. If you make a mistake Blogger will give you an error message at the top of the edit window. Either that or when you press preview you will see that something isn't right with the layout of the theme.


For both issues there is nothing to worry about. Just press either the "Back" tab, or "Revert changes" tab that are on the Edit HTML blogger page (above the code). Blogspot will give you various notifications (depending on what tab you click) on if you want to "discard the unsaved changes" - "unsaved changes will be lost". Press OK and just start the removal process again.

Quick tip. If you look to the left when in the Edit HTML window you will see numbers that get higher the further you scroll down the code. When you find the slider code make a note of the number so that if you make a mistake you can just scroll straight down to the number and start again. Makes things that bit easier. Hope this helped you out. Until the next time.

Wordpress Site Broke After PHP Edit Fix

I see this problem time and time again. Someone is editing / messing with the PHP code of a Wordpress theme, they press save, and bang, site gone. Usually, after this the website now shows a blank page. And to the many thousands of people who experience this problem who don't have much knowledge on how to quickly fix this issue, it can be very stressful. Websites broke and there's no way back. Well, the good news is there's an easy way back.

PHP is a strict taskmaster. One little mistake and it can be curtains. For a while. Just like with the Line 56 Error and many other irritating problems that can arise, in many cases the same fix will restore your site back to it's former glory. All you have to do is:

1. Log in to your Cpanel.
2. Go to your file manager
3. Click "public_html"
4. Double click the website folder with the problem
5. Double click the "wp-content" folder
6. Double click themes
7. Find the theme that has the problem
8. Right click the problem theme and choose "Rename"
9. Rename the theme folder by adding a few numbers to the end of the file / folder name

Click save or Rename file. And that's it. If you go and load your website it should now be up and running again. However, it will now be using another theme. A default theme. Because you changed the name of your main folders problem theme this automatically forces Wordpress to use another (default) one because now, the files needed to load the theme can't be found. If you want to use the same theme you were using before (which still has the error) you will need to delete it and re-upload the original template that is free of errors. You can then use the same template you were previously using. Just be more careful in the future! Hope this helped you out. Until the next time amigo.

Easy Fix: Missing Right Click WordPad


WordPad is the number one program I use on a daily basis. That may sound crazy to some, I know. However, I don't need Microsoft word, Open Office or anything else. I just need the simplistic features and non energy sapping blank white canvas that WordPad provides to do my writing and editing. It would be nice if it had a word counter, but hey, you can't have everything.

The problem of, all of a sudden having no options when right clicking in WordPad seems to be a common one. Like, nothing happens what so ever, but right clicking anywhere out of WordPad and everything is fine. Some people recommend just deleting the WordPad.INI file from the Windows folder. That will work fine. But some users are paranoid of deleting anything that's located in the C: drive of the computer in fear of removing something important, and then the computer not working anymore. And that's understandable.


So an easier, or less panicky method is to save and then close all your open WordPad files. Then go and download the free version of CCleaner. This is an excellent program. After that, simply run a clean and, just to be newbie safe, make sure the above cleaning options are selected as the pictures shows. Run the clean. Re-open your WordPad documents and give them a right click. All should be fixed. Hope this helped you out. Back to work for me. Until the next time.
JetPack Plug-In Stats Not Showing Fix

A little annoying, but in my experience with this problem, an easy fix. I've read about a few people experiencing this problem disabling the plug-in, uninstalling, and then re-installing it and all has been well. I didn't do that as I was convinced that wasn't going to solve the problem in my case. And was I right, it wasn't needed. There are most probably several causes and numerous fixes to this error. Some of the causes may be because the server were the stats are pulled from may be down. Or there could be a conflict with another plug-in. Some people have taken their sites apart trying to find out the cause of this issue!

Here is the error. You try to fetch your stats, it looks like everything is about to load but then throws up the following error message:

"We were unable to get your stats just now. Please reload this page to try again."

How to fix it? The cause of this problem for me was when Jetpack (Or Wordpress- where the stats are coming from) updated their SSL Certificate. If an SSL Certificate gets updated and your Date and Time are not correct (behind the time of the update) it will throw up all types of errors. "Connection not secure", Untrusted website, and even, We were unable to get your stats just now..

My CMOS battery has died, so my time was about one hour behind. I usually set it to what I think the time is - which is usually close enough - each day. Upon receiving this error, applying the solution, and then refreshing the stats page, I'm back in business and everything is working well. Be sure to check your date and time if you are getting this error message in Jetpack Stats.

How To Clear Android Keyboard History

Doing a quick Google search on to how clear / delete the Android keyboard history throws up many results relating to Samsung mobile phones, such as the Galaxy S7 etc. The first few pages are nothing but related to mobile phones.. This is understandable due to how popular Samsung phones are. But if you want to clear the keyboard cache on a Tablet device that's running Android, the instructions / procedure is not the same.

Other than it being a bit annoying, there are many instances in which you may want to clear the keyboard history. One could be that you were researching something and have completed it and now the history isn't relevant / needed anymore. Or you may be using a shared device and don't want someone else's history popping up every time you type something. Or, even for your own privacy. Whatever the reason, here is how to clear the keyboard history on an Android device - in this case a tablet with Android Lollipop OS installed.

1. Click the settings (cog) icon
2. Click "Language & Input"
3. Select "Android Keyboard Settings (AOSP)"
4. Click "Text Correction"
5. Turn off "Personalised Suggestions"

And that's it, the history has been cleared and wont be saved anymore. Please note: Predictive text is still activated when the above feature is turned off. Hope this helped you out. Until the next time amigo.

How To Stop Added Text In Emails Avast

If you have been getting a little confused by seeing a load of odd text appearing at the end of your Google emails, you'll be glad to know you're not alone. It looks a real mess, and it's to do with your Avast Anti-Virus. Here is an example of the text code.

<div id="DDB4FAA8-2DD7-40BB-A1B8-4E2AA1F9FDF2"><br />
> <table style="border-top: 1px solid #D3D4DE;">
>       <tr>
>         <td style="width: 55px; padding-top: 13px;"><a
> href="https://www.avast.com/sig-email?utm_medium=email&utm_source=link&utm_campaign=sig-email&utm_content=webmail"
> target="_blank"><img
> src="https://ipmcdn.avast.com/images/2016/icons/icon-envelope-tick-round-orange_184x116-v1.png"
> width="46" height="29" style="width: 46px; height: 29px;" /></a></td>
>               <td style="width: 470px; padding-top: 12px; color: #41424e;
> font-size: 13px; font-family: Arial, Helvetica, sans-serif;
> line-height: 18px;">Virus-free. <a
> href="https://www.avast.com/sig-email?utm_medium=email&utm_source=link&utm_campaign=sig-email&utm_content=webmail"
> target="_blank" style="color: #4453ea;">www.avast.com</a>
>               </td>
>       </tr>
> </table><a href="#DDB4FAA8-2DD7-40BB-A1B8-4E2AA1F9FDF2" width="1"
> height="1"></a></div>

So how do you get rid of it?

There is an easy fix.  First open up your Avast Interface. Then click the Cog symbol that's located in the top right hand corner. You should now be on the "General" Tab page of the settings. Look down the first list of options (clickable boxes).


The last box on that page is called "Enable Avast email signature". See the picture above. If you've been getting the text at the bottom of your emails this box will be ticked. UNTICK this box and press OK to save. Now send a little test email. You should now have a nice clean email with no added text from Avast. Hope this helped you out. Until the next time..

HTTP Wordpress Image Upload Error Fix

Well, wordpress has just been updated (April 2016) and as usual there are a few bugs that need fixing! Wordpress is a great platform, but I'm suffering from the flue here and just trying to keep things moving by tryin to add a hassle free post to one of my websites. Which is usually the case..No such luck though today when I'm ill. I know Wordpress can't always get everything perfect with all the different plug-ins and conflicts etc, but I wish they would test more before releasing new updates! Anyway, rant over. Here's how to be able to upload images again!.


This http wordpress error when trying to upload an image is a seriously annoying problem. Several fixes have worked for a few lucky people, but most do not work. The error remains. Deactivating all plug-ins then trying to upload an image does nothing either. Some have suggested changing the write permissions of the folders, but for me and many other people that did nothing either. So what fixes this problem?

Go to this link on github: https://github.com/getsource/default-to-gd Download the file by clicking the Download Zip button on the right hand side (See picture). Add the file to your sick wordpress site just like you were adding a new plug-in. Install and activate the new mini plug-in and you should now be able to upload pictures again. And the good thing is this file is less than 2kb in size. Right, back to work for me. Hope this helps you out! Until the next time..Hopefully not with this same error!

Popular Posts