Showing posts with label Wordpress. Show all posts

Disable "Feedback" Comments Wordpress

How To: Disable "feedback" Comments on Wordpress.org. The amount of people using BOT (automated) software to spam the hell out of WordPress websites is crazy high. Disabling the ability for visitors to leave a comment isn't good enough any more.

You can disable people from commenting, but then still get loads of spam comments coming through from the "feedback" form. For the majority of people, this sneaky backdoor comment enabling system is usually down to the Jetpack plugin and its contact form feature. It's enabled by default, and it's really annoying. So we need to turn it off.

However, if you search through the tabs trying to disable the contact form, you won't find any option to quickly turn this feature off. But the option is there. It's just hidden. Today I'll show you how to completely remove the feedback feature and totally remove the tab from the WordPress sidebar. Let's get started.

How To: Disable "Feedback" Comments from Wordpress.org


In the WordPress dashboard go to Jetpack and click the dashboard tab. Scroll all the way down to the bottom of the page and you will see a line of greyed out links, which reads as follows: [Jetpack version 8.7.1 | About | Terms | Privacy | Modules | Debug]. Here is a picture.

debug-

Click Debug [Far right]


Scroll to the bottom of the page and you will see a link that reads "Access the full list of Jetpack modules available on your site." See the image below with the location of this link highlighted in red.
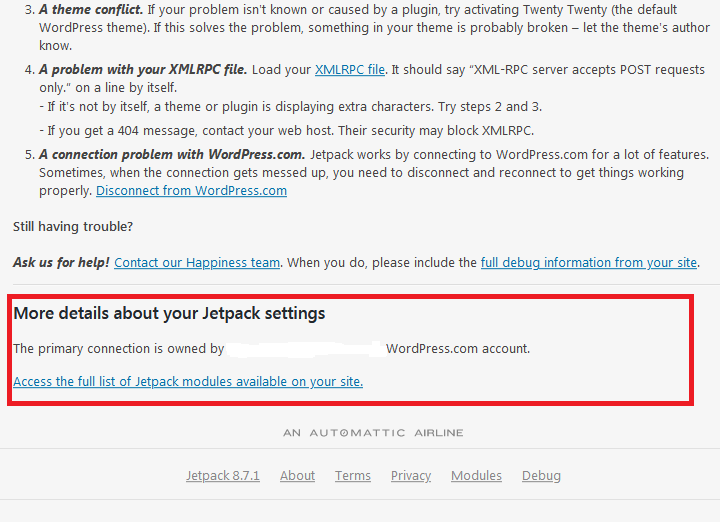
disable-modules-jetpack

Click the link


Upon clicking the link you will now see a list of all the modules. Find "Contact Form" [near the top] and deactivate it by clicking "deactivate". See the image below for the location [highlighted in red].

deactivate-contact-form-jetpack-wordpress_org


And that's it. Feedback comments are now disabled and the Feedback tab has also been removed from the WordPress dashboard sidebar. Hope this helped you out. Until the next time amigo.

Remove Footer Link From Origin Theme

How to remove the footer link from the SiteOrigin North Wordpress Theme, and add your own links and text. First off I just want to say, I understand that everyone has to make a living, and the people who make this Origin WP theme want everyone to purchase the premium theme (so they make money etc), but I personally don't like how hard they try to push this. In some forum replies, I even seen them say to people that there is no way to remove the link without purchasing premium options.

When someone, either an individual or a theme company designs and releases a theme into the Wordpress.org free themes database under a GPL (General Public License), the end user is allowed to edit / modify the theme as they see fit. That includes removing the link from the footer if they want to.

If the people over at Origin have a problem with this, don't release the theme as free on Wordpress.org. Market / Advertise it on your own Networks. Don't get me wrong, the link is easy to remove, but for someone who hasn't got much experience with websites / Wordpress, it can be a bit of a nightmare. And I've seen many threads created where people are really confused and annoyed because they can't remove the link, and are getting pushed into spending money to have full freedom over the theme. Today I will show you how to quickly remove this link. You could create a child theme and remove it that way, but I can never be bothered with those! I know, I'm silly, but I prefer to do as little work, or coding as possible to get the desired result. And I bet you do too. So here we go.

How to remove the footer link from the SiteOrigin North Wordpress Theme


Install the Origin theme. Choose "appearance" from the left hand wordpress option tabs. Click customize. Choose "Additional CSS".

Add this code to the Additional CSS box: .site-info { display: none; }

Press Publish

Yes, the dot at the start of site-info is needed so don't forget to copy that too.

You should now see that the whole footer has disappeared. So the link is gone. To add your own links and text to the footer all you need to do is add a Custom HTML widget to the the footer area. SiteOrigin North comes with a footer widget area, so go to "Widgets" and created a custom HTML widget and place it in the footer. Add all your text and links and then just align it to the location of your choice.

Example: I want my copyright information to be in the middle of the footer so it looks nice and professional. So here is the code:

<div align="center">
Copyright © yourlink - and then some more text, or even more links
</div>

And that's it. All done. If you want to add some Google Adsense Ads and have seen that when added to Origin they have a big yellow box around them, just add this snippet of code below to the "Additional CSS" box:

ins.adsbygoogle { background: transparent !important; }

Hope this helped you out. Until the next time amigo.

Wordpress Site Broke After PHP Edit Fix

I see this problem time and time again. Someone is editing / messing with the PHP code of a Wordpress theme, they press save, and bang, site gone. Usually, after this the website now shows a blank page. And to the many thousands of people who experience this problem who don't have much knowledge on how to quickly fix this issue, it can be very stressful. Websites broke and there's no way back. Well, the good news is there's an easy way back.

PHP is a strict taskmaster. One little mistake and it can be curtains. For a while. Just like with the Line 56 Error and many other irritating problems that can arise, in many cases the same fix will restore your site back to it's former glory. All you have to do is:

1. Log in to your Cpanel.
2. Go to your file manager
3. Click "public_html"
4. Double click the website folder with the problem
5. Double click the "wp-content" folder
6. Double click themes
7. Find the theme that has the problem
8. Right click the problem theme and choose "Rename"
9. Rename the theme folder by adding a few numbers to the end of the file / folder name

Click save or Rename file. And that's it. If you go and load your website it should now be up and running again. However, it will now be using another theme. A default theme. Because you changed the name of your main folders problem theme this automatically forces Wordpress to use another (default) one because now, the files needed to load the theme can't be found. If you want to use the same theme you were using before (which still has the error) you will need to delete it and re-upload the original template that is free of errors. You can then use the same template you were previously using. Just be more careful in the future! Hope this helped you out. Until the next time amigo.

JetPack Plug-In Stats Not Showing Fix

A little annoying, but in my experience with this problem, an easy fix. I've read about a few people experiencing this problem disabling the plug-in, uninstalling, and then re-installing it and all has been well. I didn't do that as I was convinced that wasn't going to solve the problem in my case. And was I right, it wasn't needed. There are most probably several causes and numerous fixes to this error. Some of the causes may be because the server were the stats are pulled from may be down. Or there could be a conflict with another plug-in. Some people have taken their sites apart trying to find out the cause of this issue!

Here is the error. You try to fetch your stats, it looks like everything is about to load but then throws up the following error message:

"We were unable to get your stats just now. Please reload this page to try again."

How to fix it? The cause of this problem for me was when Jetpack (Or Wordpress- where the stats are coming from) updated their SSL Certificate. If an SSL Certificate gets updated and your Date and Time are not correct (behind the time of the update) it will throw up all types of errors. "Connection not secure", Untrusted website, and even, We were unable to get your stats just now..

My CMOS battery has died, so my time was about one hour behind. I usually set it to what I think the time is - which is usually close enough - each day. Upon receiving this error, applying the solution, and then refreshing the stats page, I'm back in business and everything is working well. Be sure to check your date and time if you are getting this error message in Jetpack Stats.

Fix The Genesis Parse Line 56 Error WP

Wow, how annoying and scary is this problem. If you are using a Wordpress Child Theme that requires the Genesis Framework you have to be extremely careful when editing anything to do with the code. I am using the Eleven 40 Wordpress Child Theme that requires Genesis. I wanted to edit the footer code in order to put a copyright sign and place my link in the footer etc. When I entered the code and pressed update I received the dreaded error. Parse error: syntax error, unexpected ' on line 56. Website gone, what a nightmare! Even if you delete the code you just added, so everything was the same as it was before you added anything it still throws up the line 56 error! So how did I fix it? Read on below. This might not work for your problem. However, if you were trying to do the same as me (Then it should work) and you got the line 56 error then it's worth a go, right.

First off, go and sign into your hostings CPanel dashboard.

2. Go to your file manager and click it.

3. Select the website url which has the problem in order to go to its root folders

4. Double Click on wp-content

5. Double Click Themes

6. Find the theme with the problem from the list

7. Right click the theme name and choose "Rename" from the list.

8. Edit the name of the problem theme.

Example: my theme was Eleven 40, I changed it to Eleven 401. Anything will do.

9. Press save.

Now what will happen is because you renamed the theme with the problem Wordpress won't be able to find it, so Wordpress will now revert to one of the "Default" themes. This then gives you the chance to just log into your Wordpress dashboard and select another theme. Job done.

Please Note: Do not re-activate the theme you had the problem with. That theme will need to be deleted and re-installed before using it again. I'm pretty sure it will just give you the same error if you don't delete and then re-install a fresh copy. Also remember to rename the problem theme back to what it originally was. This is required in order to delete it. If its not renamed back to the original theme name then it can't be found in order to be removed / uninstalled.  Hope this helped you out.


Popular Posts