Order a Free SIM Card With 5 Pounds Free Credit

Adsense Blogger Mobile (Easiest way)

How to get Adsense ads to show up in mobile devices (Android, iOS etc) on blogger. There are several ways to do this. One of those, which involves converting the Adsense code and inserting it directly into the HTML of your blogspot blog is covered here. Some people have had trouble with this method as it can be slightly confusing for those who have limited knowledge with blogger + HTML code.

The method covered in this post is easier, but still involves the user have to add something to the code. It's not much, I promise! It's very easy, as you will discover below by following the instructions and added images to help if you get stuck. I'm going to be using this blog as my example below. Lets get to it. First go and make a new Adsense unit. Preferably a responsive Ad.

Then just go and add that to your blogspot site like you normally would by adding it to a HTML / JAVA widget. Once added go and click the "Theme" tab from the blogger sidebar options. I have added my Adsense unit to the top of this blog (leaderboard) so it makes it easier for me to show you this example. See below.

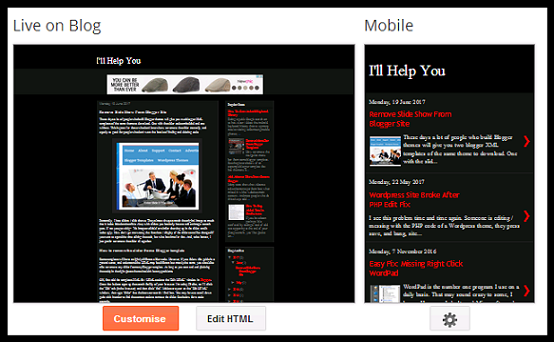
You will see that the Adsense code is visible at the top on the normal (live on blog) view. That means the Adsense ad is showing up on computers / desktops / laptops etc. This is, if they are not using an Adblocker of some sort. You will notice that in the other window (Mobile) nothing is showing up. No Ads! That means anyone viewing from an Android or iOS device won't see any Adsense.

To make the leaderboard (or any) Adsense ad show up in mobile view, here's what to do. Go to your blogger "Theme" page and click the "Edit HTML" tab (pictured above). Click the "Jump to widget" tab at the top of the HTML code. It's located next to the "Save" and "Back" tabs etc. Find the Adsense widget by clicking the widgets. In my case the Adsense widget was called HTML1. Yours probably will be, too. This will take you to the block of Adsense code. Once you can see the code look a little above it and you will see the following line, or similar depending on what HTML widget number your Adsense is located in, such as HTML1, HTML2, etc.

The line we want is: <b:widget id='HTML1' locked='false' title='' type='HTML'>. This is underlined in red above. All we need to do is add mobile='yes' to that line of code. I usually add it after - locked='false'.

So here is an example of what that line should now look like with the mobile='yes' added.

<b:widget id='HTML1' locked='false' mobile='yes' title='' type='HTML'> See the example below.

Once you have done this press save and then go and press the "Theme" tab in the blogger sidebar. Give it a few seconds to load or press the refresh button in your browser. You should now see Adsense being displayed in both normal and mobile views. See below for an example.


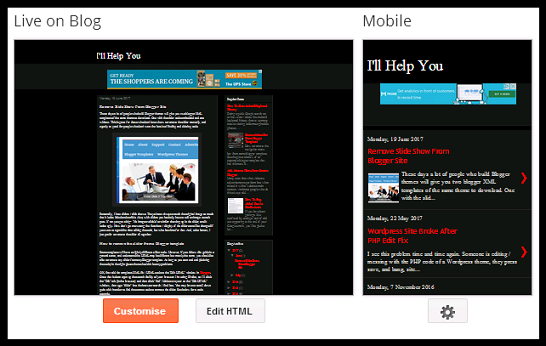
If you can not see any change you need to make sure that your mobile website is set to custom. To do this click the cog icon below the mobile window when on the "Theme" page (See the image above). Make sure "Yes. Show mobile theme on mobile devices." is selected (clicked) and that your "Choose mobile theme" is set to "Custom". Press save and refresh the page. You should now see that both views display your Adsense ad. Do this for other Adsense ads and they will also show up on mobile devices. But don't overdo it. I usually show one ad at the top and one at the bottom. Hope this helped you out. Until the next time amigo!

Remove Slide Show From Blogger Site

These days a lot of people who build Blogger themes will give you two blogger XML templates of the same theme to download. One with the slider code embedded and one without. This is great for those who don't know how to remove the slider manually, and equally as good for people who don't want the hassle of finding and deleting code.


Personally, I hate sliders / slide shows. They almost always stretch the original image so much that it looks faded and terrible. Also, with sliders you basically have to add an image to each post. If not you get a big - "No image available" or similar showing up in the slider, and it looks ugly. Now don't get me wrong, the functions / display of the slider can all be changed if you want to spend the time editing the code, but who has time for that. And, to be honest, I just prefer to remove the slider all together.

How to remove the slider from a Blogger template


Some templates will have a slightly different slider code. However, if you follow this guide in a general sense, and understand the HTML may be different but mostly the same, you should be able to remove any slider from any Blogger template. As long as you start and end (deleting the code) in the right places there shouldn't be any problems.

OK, first add the templates XML file / HTML code to the "Edit HTML" window in Blogspot. Once that is done open up the search facility of your browser. I'm using Firefox, so I'll click the "Edit" tab (in the browser) and then click "find". Make sure your on the "Edit HTML" window, then type "slider" into the browser search / find box. You may have to scroll down quite a bit in order to find the correct code to remove the slider. See below for a code example.

Note: Some templates, like the one I'm using as an example, mark their codes with a start and end. Such as <!-- featured post slider started -->. This is great as it makes our lives that little bit easier when taking the HTML out, because all you then need to do is remove everything in between the start and end. Job done. Be aware though, not all templates have this, so here is a code as an example of what you need to remove. Ignore the <!-- featured post slider started --> and <!-- featured post slider end --> if the template you are working with does not have them and just take out everything else.

<!-- featured post slider started -->
<b:if cond='data:blog.pageType != &quot;static_page&quot;'>
<b:if cond='data:blog.pageType != &quot;item&quot;'>

<div class='carousel slide' data-ride='carousel' id='myCarousel'>
   
<ol class='carousel-indicators'>
    <li class='active' data-slide-to='0' data-target='#myCarousel'/>
    <li data-slide-to='1' data-target='#myCarousel'/>
    <li data-slide-to='2' data-target='#myCarousel'/>
</ol>

<div class='carousel-inner'>

<div class='item active'>
   <a href='ENTER-SLIDE-1-LINK-HERE'>
   <img src='https://blogger.googleusercontent.com/img/b/R29vZ2xl/AVvXsEgHPCmpL_S6lV3BPHvDxDcD6ukTVeJtZ7-1d2qp2pRz4Ptn6fb5gMnwGs79QHvpU57wPgxx-BSVNEt6eJEeHUdO66id5zOVyaQx3Mwc0qy6lhfVA6hXgcmrrA60nddp7kDRLQifBSh2xu8/s320/slide1.jpg'/>
   </a>
   <div class='carousel-caption'>
      <p>Enter Slide 1 Title Here.</p>
   </div>
</div>

<div class='item'>
   <a href='ENTER-SLIDE-2-LINK-HERE'>
   <img src='https://blogger.googleusercontent.com/img/b/R29vZ2xl/AVvXsEjMlASH7tM9M19f4qusKNCa8tuQPIUxXimXOw9rr24nKWgfZ45P37A6LBvaEMwBS3D1MFFc3-eRzBGNWpX0lZF9WX9HmW6uiotaTzHP1OHf686YaKUunYfkJd206YW253enkoCLC1_Ssjs/s1600/slide2.jpg'/>
   </a>
   <div class='carousel-caption'>
      <p>Enter Slide 2 Title Here.</p>
   </div>
</div>

<div class='item'>
   <a href='ENTER-SLIDE-3-LINK-HERE'>
   <img src='https://blogger.googleusercontent.com/img/b/R29vZ2xl/AVvXsEjKab8admG_Pe69DlW93OtZRnMGUSFbWnr_R188YrHhV6vLUM_nYokh1lDAGLgDB47C17S2T-k2uZd4kjIguZofiqNzM84oeBcsiAj0P4sRbk9mQSRTJyqdJuOna4yaHd5pBA4DLZHUZ0o/s1600/slide3.jpg'/>
   </a>
   <div class='carousel-caption'>
      <p>Enter Slide 3 Title Here.</p>
   </div>
</div>

</div>

<a class='left carousel-control' data-slide='prev' href='#myCarousel'><span class='glyphicon glyphicon-chevron-left'><img alt='First slide' src="https://blogger.googleusercontent.com/img/b/R29vZ2xl/AVvXsEi_7aDFUX4JpbcVVbPxxuYKiB27T_252A8Oy1mfjNGDBmEoNaUZSTx6GsR13f8fmBR-sOfhxgId4R7nQVFB35IcWEodxWM_du4VSAw56zdYDP0AidGwLcq-YRfYCfapK0DBoBQrtx09sirC/s1600/previous-arrow.png"/></span></a>
<a class='right carousel-control' data-slide='next' href='#myCarousel'><span class='glyphicon glyphicon-chevron-right'><img alt='Next' src="https://blogger.googleusercontent.com/img/b/R29vZ2xl/AVvXsEh8OuB3YUECSdlB6WG1XnPAFNKsR2BAU4sVmhvr6Bmwp9vubgEWZGnnYS3XTKsVU6sCrrf4O2BWpJVdaQ43paw_HQ7z4ON2GUPcZ5xgtvpJVVvafDPHxdgeHmbAJgLtCq34-SN6i2NhyOMS/s1600/next-arrow.png"/></span></a>

</div>

</b:if>
</b:if>
<!-- featured post slider end -->


Take that ^ code out (or similar depending on the template) and then press preview. The slider should now have disappeared. If everything looks good and you are ready to proceed press "save theme". And that's it, the slider is now gone and you can start posting some content on your blog. As long as you take out the correct amount of "B" and "Div" tags (opening and closing tags: Example: </div> - </b:if>) you will be fine. If you make a mistake Blogger will give you an error message at the top of the edit window. Either that or when you press preview you will see that something isn't right with the layout of the theme.


For both issues there is nothing to worry about. Just press either the "Back" tab, or "Revert changes" tab that are on the Edit HTML blogger page (above the code). Blogspot will give you various notifications (depending on what tab you click) on if you want to "discard the unsaved changes" - "unsaved changes will be lost". Press OK and just start the removal process again.

Quick tip. If you look to the left when in the Edit HTML window you will see numbers that get higher the further you scroll down the code. When you find the slider code make a note of the number so that if you make a mistake you can just scroll straight down to the number and start again. Makes things that bit easier. Hope this helped you out. Until the next time.

Wordpress Site Broke After PHP Edit Fix

I see this problem time and time again. Someone is editing / messing with the PHP code of a Wordpress theme, they press save, and bang, site gone. Usually, after this the website now shows a blank page. And to the many thousands of people who experience this problem who don't have much knowledge on how to quickly fix this issue, it can be very stressful. Websites broke and there's no way back. Well, the good news is there's an easy way back.

PHP is a strict taskmaster. One little mistake and it can be curtains. For a while. Just like with the Line 56 Error and many other irritating problems that can arise, in many cases the same fix will restore your site back to it's former glory. All you have to do is:

1. Log in to your Cpanel.
2. Go to your file manager
3. Click "public_html"
4. Double click the website folder with the problem
5. Double click the "wp-content" folder
6. Double click themes
7. Find the theme that has the problem
8. Right click the problem theme and choose "Rename"
9. Rename the theme folder by adding a few numbers to the end of the file / folder name

Click save or Rename file. And that's it. If you go and load your website it should now be up and running again. However, it will now be using another theme. A default theme. Because you changed the name of your main folders problem theme this automatically forces Wordpress to use another (default) one because now, the files needed to load the theme can't be found. If you want to use the same theme you were using before (which still has the error) you will need to delete it and re-upload the original template that is free of errors. You can then use the same template you were previously using. Just be more careful in the future! Hope this helped you out. Until the next time amigo.

Popular Posts