Why Is Firefox So Slow Fix August 2018

You know when problems arise and you think to yourself, I really don't need this right now. That's what I've been feeling like with this Firefox running at a snail pace problem. Why is it so slow? Well, first I should say. Due to people using different operating systems, from Windows to Android, and with each individual have different software and programs running on their computers (and Smartphones) this fix will is not going to be a one size fits all. However, it did work for me, instantly. And now my Firefox is working really fast again.

What Fixed A Lethargic Firefox


For me it was just a simple case of disabling what has now come to be a real problem bit of software for me. That is Shockwave Flash. Once Adobe stop updating and the scripts in the software are outdated and lag behind, which is very common as Adobe seem to only release an update once or twice a year, it has the ability to slow browsers down to a snails pace. Images take ages to load, videos stall and take a long time to render, web pages stop responding etc. For some reason Shockwave Flash was putting a serious strain on my system by using up all the computer RAM and making everything become unstable. It's seriously annoying.

How To Disable Slowness

Why-is-firefox-so-slow-2018

Go to the Add-ons page in Firefox, find Shockwave Flash and disable it completely. Restart your browser and that should be all that is needed. I also disabled the OpenH264 Video Codec 1.6 by Cisco Systems for good measure, and now everything is working smoothly again. This fix may not work for everyone, but its definitely worth a go if you have Shockwave Flash installed in your Firefox Add-ons. Is there an update out for Flash, I don't know, but I'm so annoyed with it, that I'll probably never enable it again. It's not like its desperately needed anyway. Hope this helped you out and you get what feels like a turbo boosted Firefox again like I'm experiencing right now. Until the next time amigo.

Get A Working Dark Minima Blogger Theme

I love using the older classic basic Blogger templates. Have you tried to find an old school 2 column dark / black Minima Blogspot theme lately. I have. What an annoying experience. Basically all of them are filled with errors. And some of the sites are just listing an image of the theme itself with no download option. One guy even has his little script set up on his Blogspot blog to "Please disable Adblock to continue". Wow, really mate. On a Blogspot! Now don't get me wrong, I could remove the errors if I had the patience, but why bother when there's a much quicker, less stressful fix to this situation.


black-dark-minima-blogger-blogspot-theme


How to get a fresh Black Minima Template


All you have to do is download the 2 column white version of Minima. You can download that here. Make sure you save it somewhere on your hard drive. We need to preserve the Minima theme, as its not as widespread, or as downloadable in as many places as I thought it would be.

Download, unzip the file and then install. If you install certain themes on Blogger, that are not part of their standard theme library, sometimes it won't let you edit anything in the templates "customise" editor.

Thankfully for us, Blogger does allow certain things to be changed when using the Minima theme, mostly just the colours and fonts. But that's all we need. So all you have to do is turn the theme black in the customiser and then change the rest of the colours and fonts as you see fit.

If you want to use some of the dull hex colours that were used on the original black Minima, here are some of the main ones. Background #000000 - Page Text #cccccc - Link colour #99aadd - Post Title #aadd99 - Sidebar Title #777777 - Visited Link #aa77aa. I believe the fonts are the same with both templates, so if you want the original fonts just don't change anything and that will be fine. So there you go, a fully functional Black Minima. One of the best and easiest themes to work with. Hope this helped you out. Until the next time amigo.

How To Edit Your Channel Art On YouTube

How to fix the "sign-in" loop error that occurs when trying to change / edit your YouTube channel. If you're here, I'm sure you know all about this annoying issue. You try to change your channel art and it just keeps asking you to sign-in, even though you are already fully signed in. This fix is intended for Firefox, because that's what browser I use. But it will also work with any of the other browser by just applying this same easy optional change to the way your browser is dealing with Cookies. In Chrome the process may be a bit different in terms of what tabs you need to click on to change the Cookie settings. But it shouldn't be too different to this.

How to fix the Sign-In error when editing a YouTube channel using Firefox


Go to the channel you want to edit and make sure you are signed in. Then head over to your "Tools" tab in the Firefox top menu and click "Options". Then click "Privacy".

Look to where it says "Accept cookies from sites". Directly below this it says "Accept third-party cookies". Next to this there is a drop down menu. Change the setting in the menu, which should say "From Visited" to "Always". See below for an image example.

fix-the-sign-in-loop-error-youtube-channel-edit

So now you are always accepting cookies from third party sites. Don't worry, after you have edited your channel you can just change this back to the way it was (From Visited). After you have changed this setting to "Always" go and refresh your YouTube channel and try to edit the channel art. It should now allow you to change whatever you like without anymore problems. Hope this helped you out. Until the next time amigo.

Remove Footer Link From Origin Theme

How to remove the footer link from the SiteOrigin North Wordpress Theme, and add your own links and text. First off I just want to say, I understand that everyone has to make a living, and the people who make this Origin WP theme want everyone to purchase the premium theme (so they make money etc), but I personally don't like how hard they try to push this. In some forum replies, I even seen them say to people that there is no way to remove the link without purchasing premium options.

When someone, either an individual or a theme company designs and releases a theme into the Wordpress.org free themes database under a GPL (General Public License), the end user is allowed to edit / modify the theme as they see fit. That includes removing the link from the footer if they want to.

If the people over at Origin have a problem with this, don't release the theme as free on Wordpress.org. Market / Advertise it on your own Networks. Don't get me wrong, the link is easy to remove, but for someone who hasn't got much experience with websites / Wordpress, it can be a bit of a nightmare. And I've seen many threads created where people are really confused and annoyed because they can't remove the link, and are getting pushed into spending money to have full freedom over the theme. Today I will show you how to quickly remove this link. You could create a child theme and remove it that way, but I can never be bothered with those! I know, I'm silly, but I prefer to do as little work, or coding as possible to get the desired result. And I bet you do too. So here we go.

How to remove the footer link from the SiteOrigin North Wordpress Theme


Install the Origin theme. Choose "appearance" from the left hand wordpress option tabs. Click customize. Choose "Additional CSS".

Add this code to the Additional CSS box: .site-info { display: none; }

Press Publish

Yes, the dot at the start of site-info is needed so don't forget to copy that too.

You should now see that the whole footer has disappeared. So the link is gone. To add your own links and text to the footer all you need to do is add a Custom HTML widget to the the footer area. SiteOrigin North comes with a footer widget area, so go to "Widgets" and created a custom HTML widget and place it in the footer. Add all your text and links and then just align it to the location of your choice.

Example: I want my copyright information to be in the middle of the footer so it looks nice and professional. So here is the code:

<div align="center">
Copyright © yourlink - and then some more text, or even more links
</div>

And that's it. All done. If you want to add some Google Adsense Ads and have seen that when added to Origin they have a big yellow box around them, just add this snippet of code below to the "Additional CSS" box:

ins.adsbygoogle { background: transparent !important; }

Hope this helped you out. Until the next time amigo.

Adsense Blogger Mobile (Easiest way)

How to get Adsense ads to show up in mobile devices (Android, iOS etc) on blogger. There are several ways to do this. One of those, which involves converting the Adsense code and inserting it directly into the HTML of your blogspot blog is covered here. Some people have had trouble with this method as it can be slightly confusing for those who have limited knowledge with blogger + HTML code.

The method covered in this post is easier, but still involves the user have to add something to the code. It's not much, I promise! It's very easy, as you will discover below by following the instructions and added images to help if you get stuck. I'm going to be using this blog as my example below. Lets get to it. First go and make a new Adsense unit. Preferably a responsive Ad.

Then just go and add that to your blogspot site like you normally would by adding it to a HTML / JAVA widget. Once added go and click the "Theme" tab from the blogger sidebar options. I have added my Adsense unit to the top of this blog (leaderboard) so it makes it easier for me to show you this example. See below.

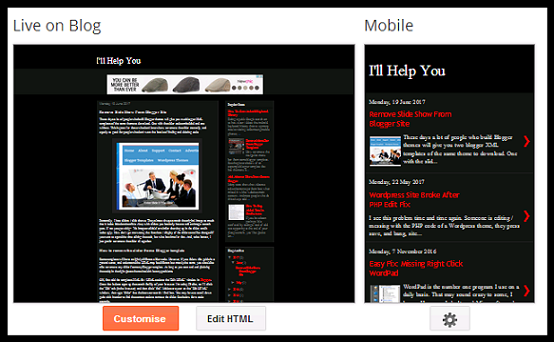
You will see that the Adsense code is visible at the top on the normal (live on blog) view. That means the Adsense ad is showing up on computers / desktops / laptops etc. This is, if they are not using an Adblocker of some sort. You will notice that in the other window (Mobile) nothing is showing up. No Ads! That means anyone viewing from an Android or iOS device won't see any Adsense.

To make the leaderboard (or any) Adsense ad show up in mobile view, here's what to do. Go to your blogger "Theme" page and click the "Edit HTML" tab (pictured above). Click the "Jump to widget" tab at the top of the HTML code. It's located next to the "Save" and "Back" tabs etc. Find the Adsense widget by clicking the widgets. In my case the Adsense widget was called HTML1. Yours probably will be, too. This will take you to the block of Adsense code. Once you can see the code look a little above it and you will see the following line, or similar depending on what HTML widget number your Adsense is located in, such as HTML1, HTML2, etc.

The line we want is: <b:widget id='HTML1' locked='false' title='' type='HTML'>. This is underlined in red above. All we need to do is add mobile='yes' to that line of code. I usually add it after - locked='false'.

So here is an example of what that line should now look like with the mobile='yes' added.

<b:widget id='HTML1' locked='false' mobile='yes' title='' type='HTML'> See the example below.

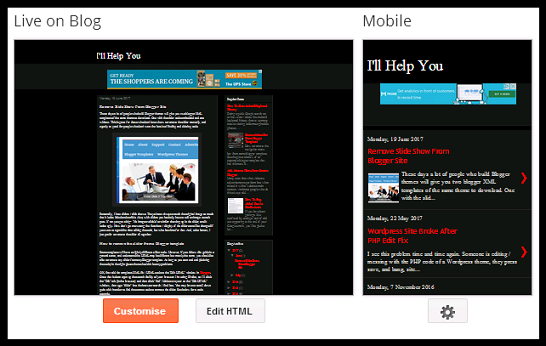
Once you have done this press save and then go and press the "Theme" tab in the blogger sidebar. Give it a few seconds to load or press the refresh button in your browser. You should now see Adsense being displayed in both normal and mobile views. See below for an example.


If you can not see any change you need to make sure that your mobile website is set to custom. To do this click the cog icon below the mobile window when on the "Theme" page (See the image above). Make sure "Yes. Show mobile theme on mobile devices." is selected (clicked) and that your "Choose mobile theme" is set to "Custom". Press save and refresh the page. You should now see that both views display your Adsense ad. Do this for other Adsense ads and they will also show up on mobile devices. But don't overdo it. I usually show one ad at the top and one at the bottom. Hope this helped you out. Until the next time amigo!

Popular Posts